Eizo CG275W Calibration Guide Using Lightspace And ColorNavigator
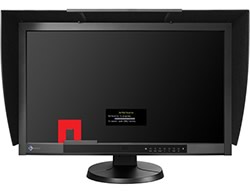
This is a display calibration guide and workflow for the Eizo ColorEdge CG275W 27" Widescreen LCD Display to achieve the best possible color and gamma performance.
This guide covers various calibration approaches using , ColorNavigator and dedicated calibration & profiling workflow tools from DisplayCalibrationTools.com.
The calibration target in this guide is Rec 709 Gamma 2.2 but the workflow described here can be used for any other calibration target such as sRGB, DCI P3, BT.1886 etc.
The Eizo CG275W comes with a few preset default modes which are (somewhat) accurate in the beginning (when you purchase the screen new) but as any other screen, the Eizo drifts over time and then these preset modes become completely useless because you cannot re-calibrate them, so they become more and more inaccurate over time.
This model right here has just 700 hours on it and the default modes are now unusable for color critical application.
The biggest concern with the Eizo is that they suffer from LCD backlight contamination, which not even a 3D LUT can fix. The Eizo R&D dept in Japan that communicated with us over a period of 2 months confirmed this behavior on other units & models. It's a general LCD issue that Eizo did not get (fully) under control, although in real world application this is much less of a concern than it might appear on the CIE charts. But, (more expensive) panels from other manufacturers perform better in the shadows.
Although this is not optimal, it is less drastic as it looks on the CIE charts below because color errors within the shadows (dark colors) are less preceivable than in the midtones or highlights and the screen does perform quite well after proper 3D LUT calibration which (in this calibration workflow) is uploaded directly into the internal memory of the display.
The Eizo CG275W has 3 user modes: CAL 1 | CAL 2 | CAL 3 and each of the 3 CAL modes have their own, separate memory bank. The CAL modes are triggered by a specific cable connection, so in order to calibrate a specific CAL mode you must be connected with the corresponding cable:
- you can access and calibrate CAL1 when connected via DVI
- you can access and calibrate CAL2 when connected via DisplayPort (DP)
- you can access and calibrate CAL3 when connected via miniDisplayPort (miniDP)
This workflow covers 3 ways to calibrate the CG275W:
- ColorNavigator only
- Lightspace only
- Pre Profiling Setup
- Custom Profiling Patch Set
- Pattern Generator Setup Using Lightspace Calibration Client
- LUT Creation & LUT Upload
- Gamma Validation
- Gamma Improvement
- Custom Color Space Gamma Validation & Further Adjustments
- Eizo Active LUT Distortion
- Color Validation - 1087 Point Patch Set
- Color Validation - SG Flesh Tones
- Color Validation - Color Checker SG
- Color Validation - Delta E 2000 Filter 2.3
- ColorNavigator and Lightspace (via a 3D LUT merge)
Equipment, software and target used in the calibrations listed below:
- Colorimeter: Klein K10-A
- Spectro: i1Pro
- Lightspace 6.6.0
- Color Navigator 6.4.6.8
- Calibration target: Rec 709 Gamma 2.2
- LUT holder: internal memory of Eizo
- workflow tools: Custom Color Patch Sequence Generator, Lightspace Profile Reporter, Lightspace Custom Color Space Creator
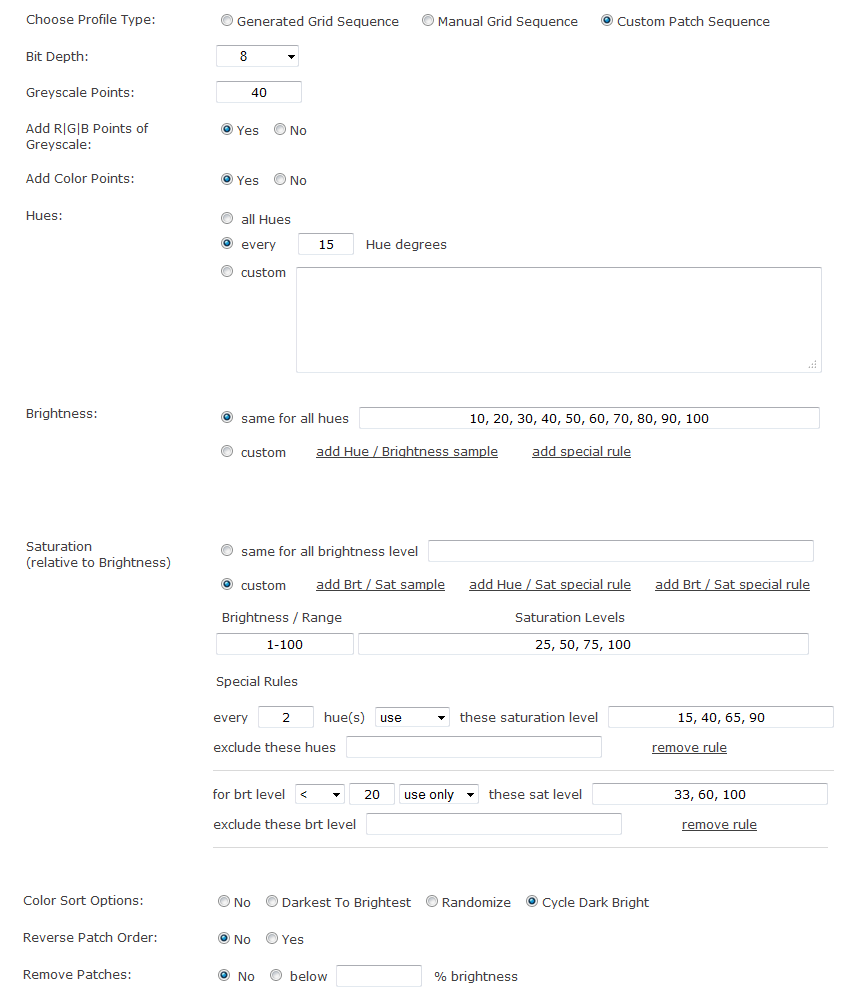
Custom Validation Patch Set 1087 Points
For calibration performance validation, we used a custom 1087 point validation patch set that was created via the Custom Color Patch Sequence Generator - here are the parameters:
To learn more about how custom patch sets can improve your calibration please read the Advantage Of Custom Color Patch Sets In Display Calibration guide.
Eizo Calibration Via ColorNavigator
The advantage of the ColorNavigator only calibration approach is that you can directly dial in the calibration settings (brightness, luminance, gamma etc) that you want and then have ColorNavigator do all the rest automatically.
Unfortunately, the workflow using ColorNavigator poses a few problems:
1) ColorNavigator does not allow spectro offsets (or reference meter offsets), ergo you are using your colorimeter without an offset which is amateurish considering we are calibrating Pro grade screens intended for color critical application. If you are trying to just use your spectro as the active meter for profiling, then your low light readings will be very inaccurate.
Even when using Pro colorimeters like the Klein K10-A that have internal offset slots (that you can pre-load with offsets using Klein's Chromasurf software) cannot circumvent this missing feature, as ColorNavigator does not allow you to select a slot and only uses slot 0 from the K10, which is the no-compensation slot.
This missing feature alone makes ColorNavigator not suitable for color critical calibration.
2) ColorNavigator uses the internal patches of the Eizo screen - those are patches that the monitor produces, NOT (!) the graphic card. This is a great option to calibrate the screen as an all-around monitor (being used with multiple workstations, on-set etc), but it does not accommodate for the (possible) graphic card distortion of any of the host PC's involved - so if u're using the Eizo stationary on a single workstation, this is not a great calibration approach.
3) The profiling process in ColorNavigator only samples a few points - the entire profiling session takes 4.30 mins. So the 3D LUT that ColorNavigator creates is calculated from these few points only. Considering that the Eizo internally stores a 64^3 LUT (with 274,625 points) that means A LOT of these points are interpolated from just a tiny bit of data. Not very accurate.
4) Validation in ColorNavigator also only samples a few points, so not a true representation of how the display performs.
Below is a validation report of a ColorNavigator calibration for target Rec 709 Gamma 2.2, 100 cdm luminance and minimum black level, which was done using a K10-A. As mentioned above it was not possible to create a spectro (reference meter) offset.
The 2 main reasons why the validation report results below (which are very accurate) differ from the always "pretty good" validation reports that you can do within ColorNavigator are:
- ColorNavigator profiles and validates using meters without reference offset, ergo the active meter provides inaccurate readings (depending on how much "off" your active meter is) which leads to less accurate correction calculations (based on inaccurate data) when ColorNavigator creates the 3D LUT. Our validation done in Lightspace did use a spectro offset and the reported data is much more accurate.
- The internal ColorNavigator validation only has 132 points. Some of them line up with the profiling points, which makes results look pretty good. The custom 1087 point set used below profiles the displays gamut much more thoroughly.
So, to ensure a proper evaluation of the ColorNavigator calibration, the validation below was done using , K10-A with i1Pro spectro offset, a custom 1087 point validation patch set (see above for details) and the Lightspace Profile Reporter tool.
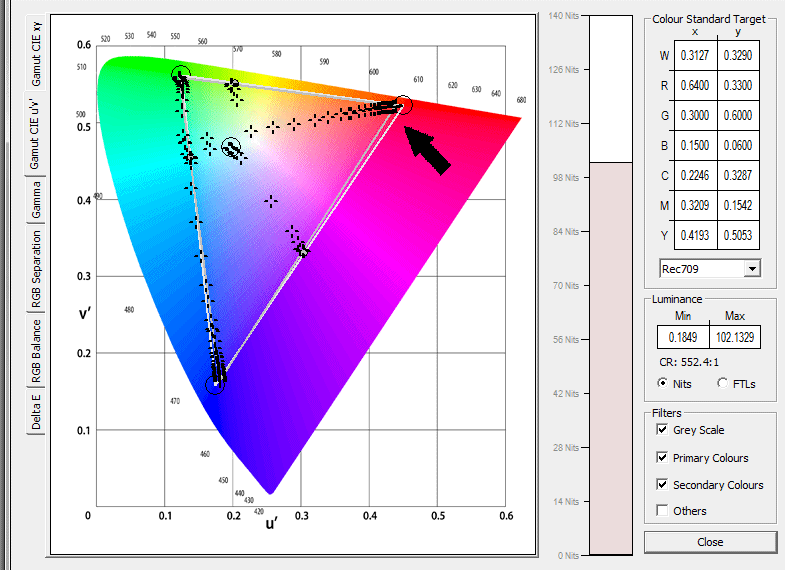
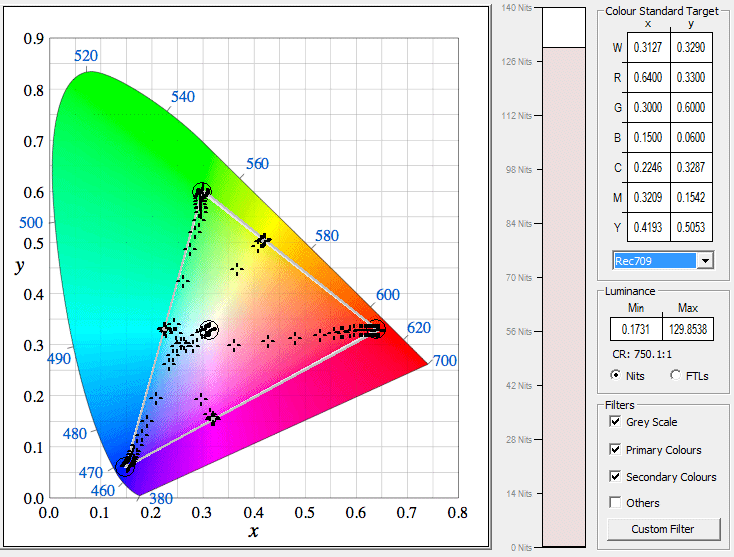
Here's a CIE uv graph of the ColorNavigator Rec 709 Gamma 2.2 calibration - note that the red primary color is off. The "trails" leading up to R|G|B|C|M|Y indicate low saturation in the shadows (typical for LCD displays) and we can see the blue/cyan backlight contamination.
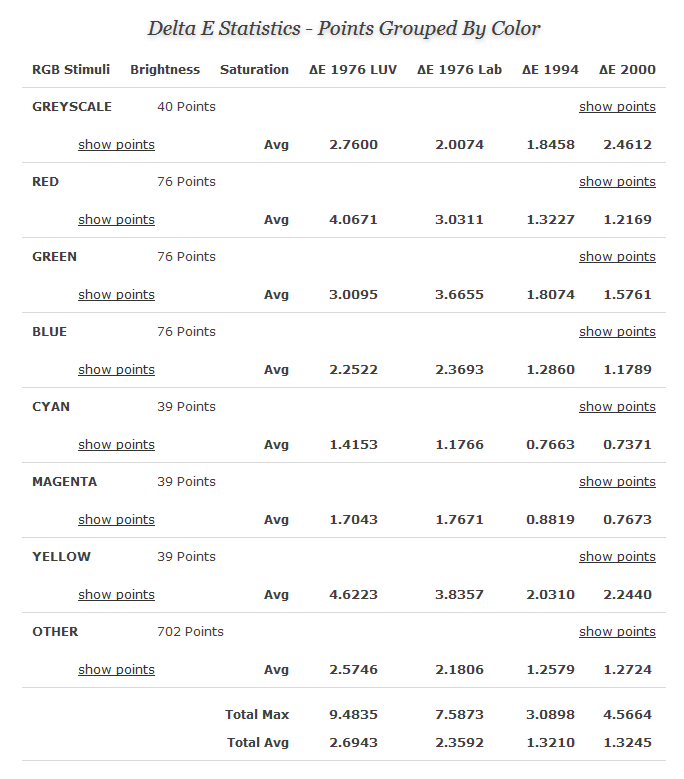
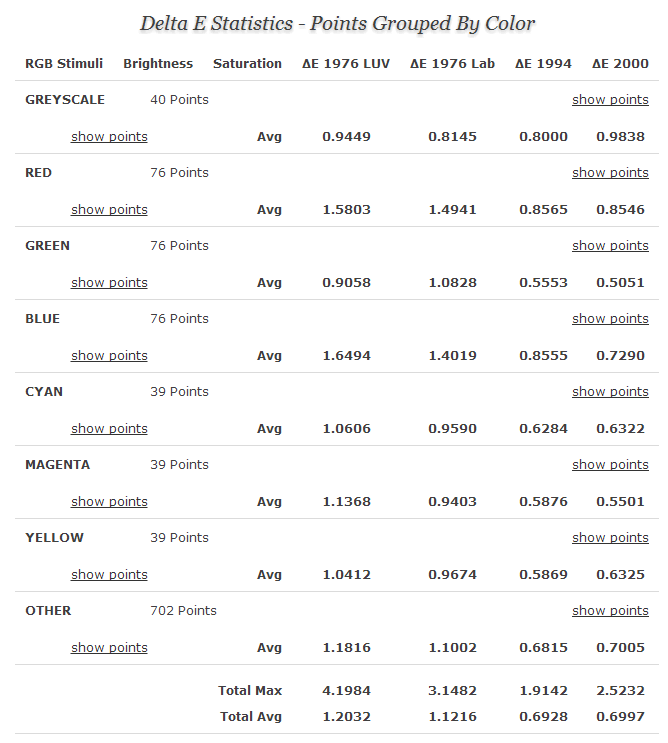
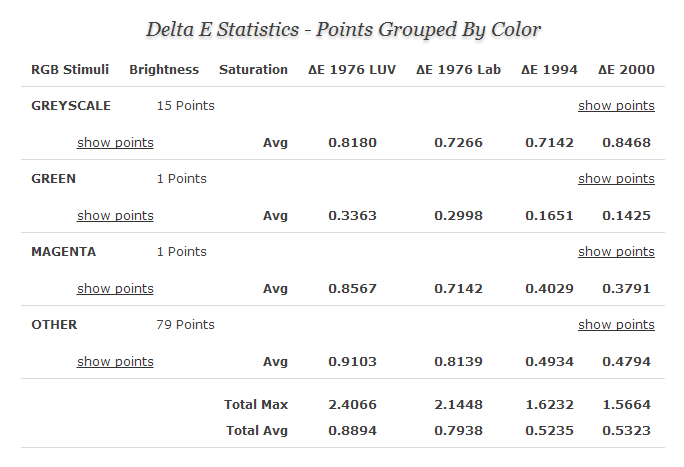
Here's the delta E overview report of the Lightspace Profile Reporter for each of the 1087 validation points categorized by color groups - the detailed profile points data was collapsed for each of the individual color groups:
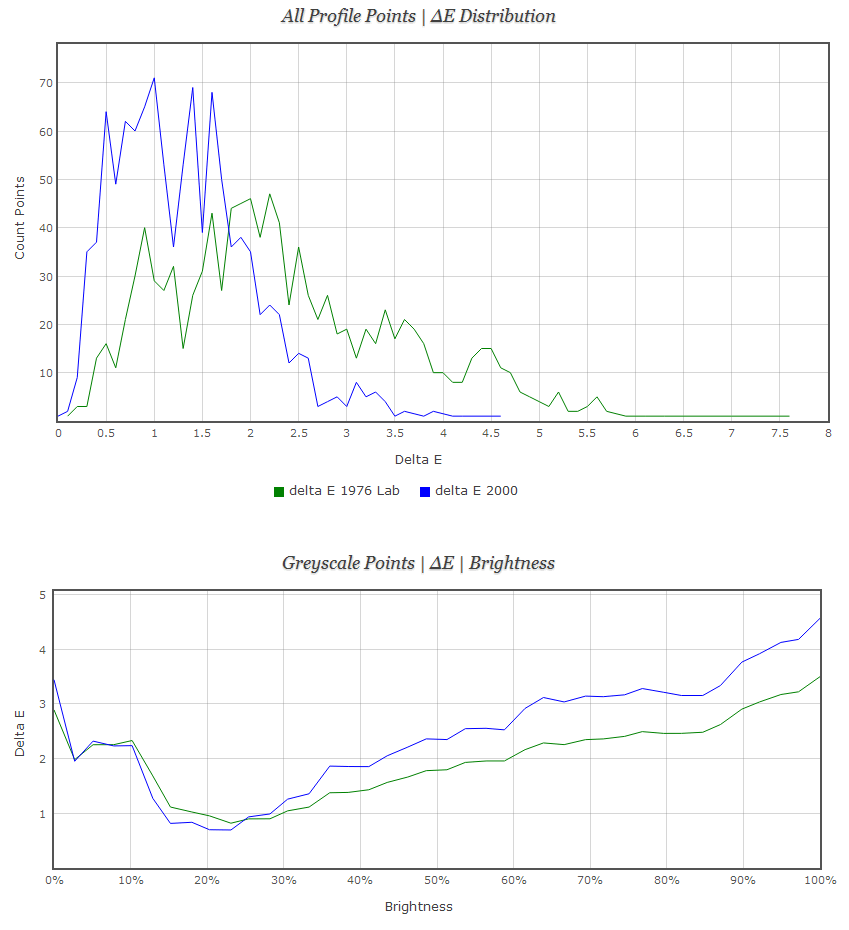
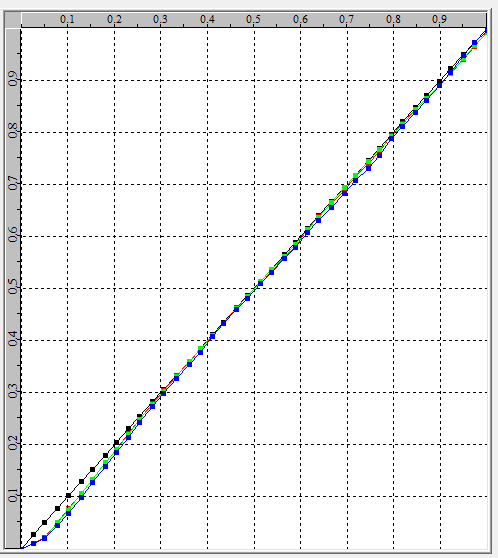
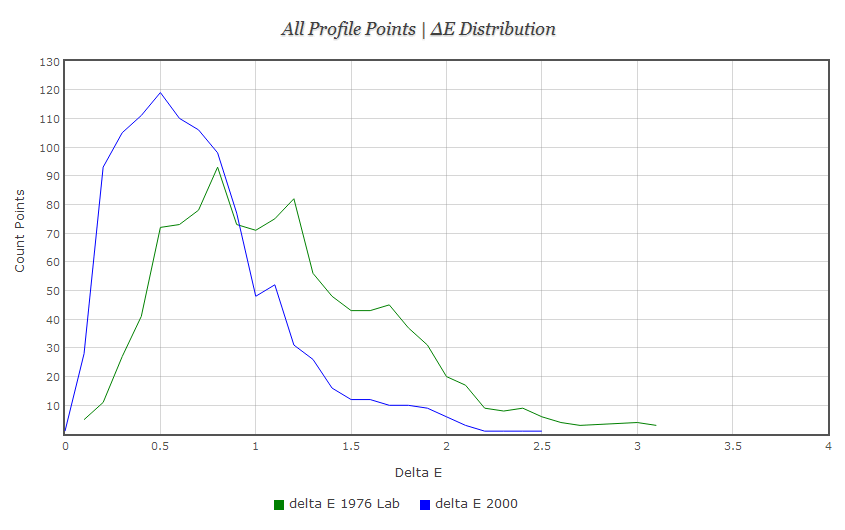
Delta E distribution graph and Greyscale performance graph from the validation in Lightspace Profile Reporter - the delta E formulas were reduced to just dE 1976 Lab and dE2000 for a better view of the graphs:
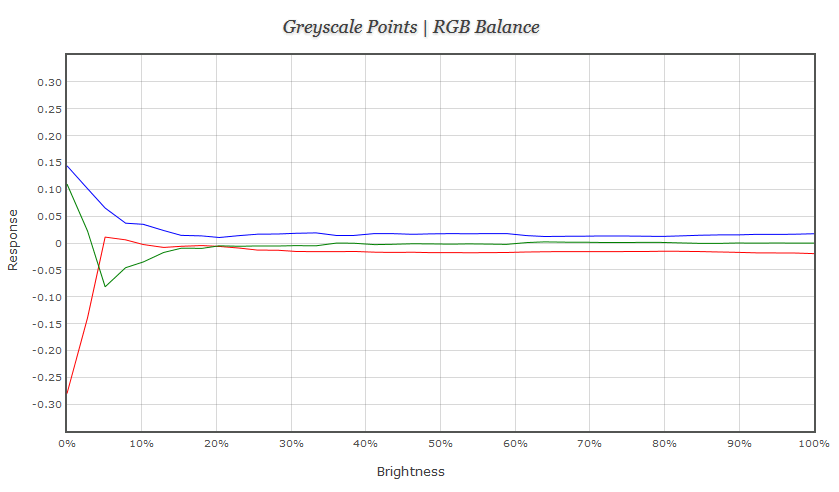
Here is the Lightspace Profile Reporter graph of the RGB Balance:
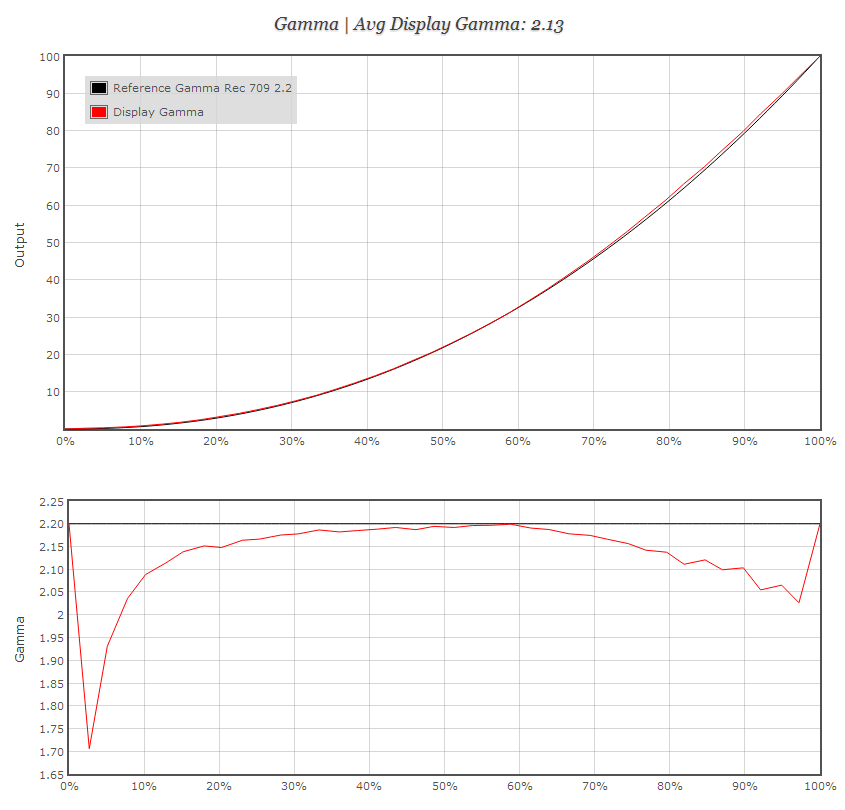
Here are the Lightspace Profile Reporter graphs of the Gamma performance:
Eizo Calibration Via Lightspace
- Pre Profiling Setup
- Custom Profiling Patch Set
- Pattern Generator Setup Using Lightspace Calibration Client
- LUT Creation & LUT Upload
- Gamma Validation
- Gamma Improvement
- Custom Color Space Gamma Validation & Further Adjustments
- Eizo Active LUT Distortion
- Color Validation - 1087 Point Patch Set
- Color Validation - SG Flesh Tones
- Color Validation - Color Checker SG
- Color Validation - Delta E 2000 Filter 2.3
Lightspace was the first commercial solution to fully integrate Eizo calibration. Lightspace can directly access the screen and control the internal patterns of the screens as well as upload directly to the internal memory.
Pre Profiling Setup
For a Lightspace only calibration we reset the CAL (1|2|3) modes to all default (--> Color Mode reset via OSD) or upload a NULL CUBE to the internal memory via Lightspace. You have to do this before you start the profiling session to ensure the internal memory is reset.
Unfortunately, none of the 3 CAL modes allow you to setup the screen before profiling because there are no CMS controls in the OSD for any of the CAL modes. Usually a pre-profile setup would include brightness, contrast and at least setting the white point but the only way to do this on the CG275W is via ColorNavigator, which we are not using in this calibration approach, so you have live with what the CAL mode gives you by default.
In the case of the CG275W this results in a bad whitepoint with dE 2000 of 3 and a (bad) Gamma of 2.1.
Custom Profiling Patch Set
In this calibration, the Lightspace profile below was done using a K10-A with spectro offset and a custom 10,142 point patch set created via the Custom Color Patch Sequence Generator.
Here are the parameters used to create the custom 10K profiling patch set - you could easily change some parameters to make this set smaller:
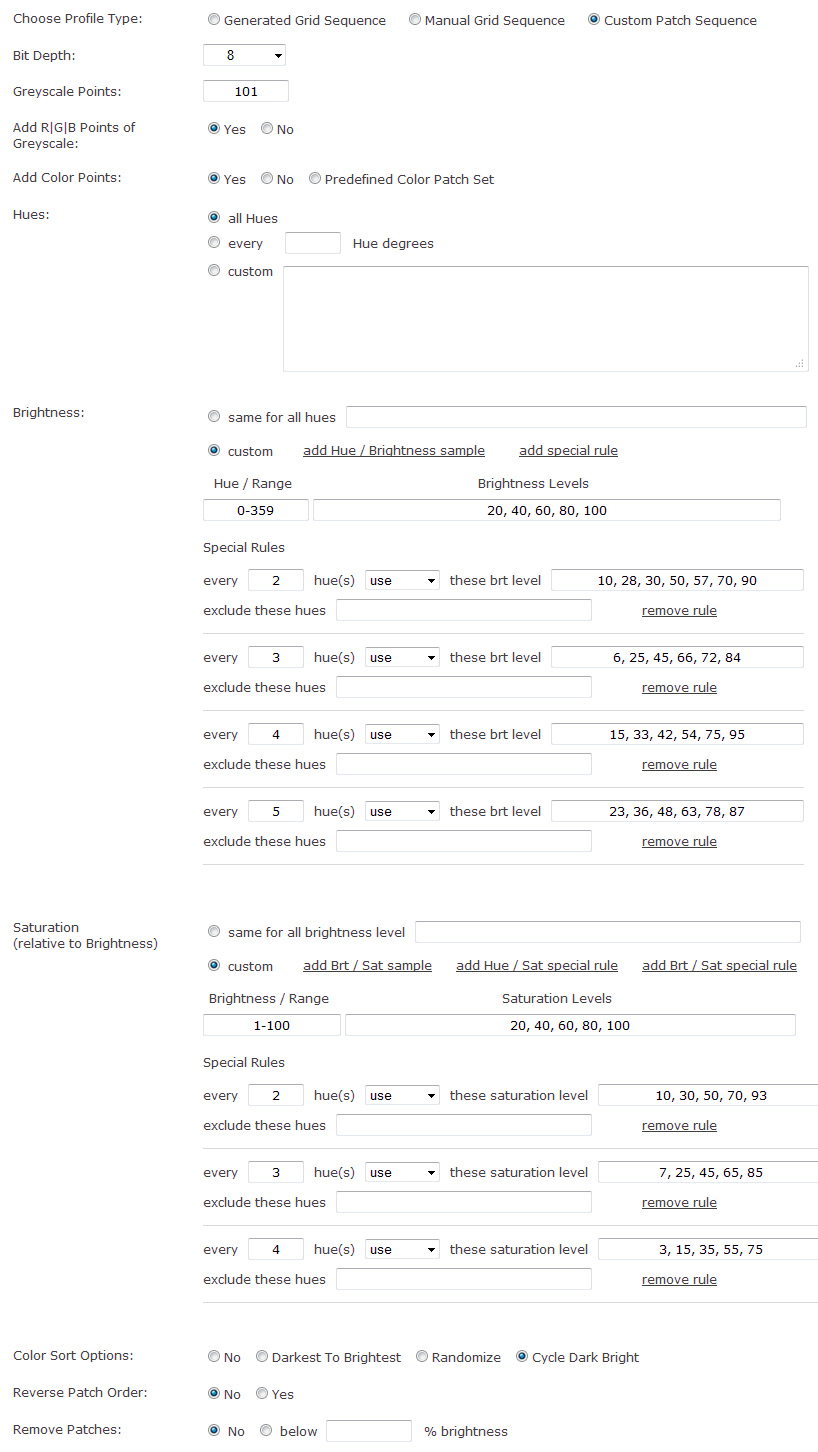
To learn more about how custom patch sets can improve your calibration please read the Advantage Of Custom Color Patch Sets In Display Calibration guide.
Pattern Generator Setup Using Lightspace Calibration Client
We will display the color patches via the host PC's graphic card - that is the PC that is directly connected to the Eizo.
This particular Eizo screen will only be used on this workstation and that is why we want to display the patterns from the workstation to accommodate for the (possible) distortion that the graphic card of this workstation might introduce. This will help to create a more accurate display profile.
We will be using the Lightspace Calibration Client which is a free tool (that comes with Lightspace) that helps us create a network bridge from our notebook (where Lightspace is installed) to the workstation where we want to display the patches that Lightspace generates.
Here are the steps:
- Connect the notebook (that has Lightspace installed) via hardwire to the same network that the workstation (that is connected to the Eizo) is in. A wireless connection is not recommended as it may introduce lag.
- On the workstation (that is connected to the Eizo) remove all ICC profiles and turn off / disable color management. Make sure no application is running that can re-enable ICC profiles. Best option is to uninstall all of these applications, including ColorNavigator.
- On our notebook where Lightspace is installed, we go to the Lightspace installation directory which is usually (on a Windows PC) located at C:\Program Files (x86)\Light Illusion\LightSpace CMS. You will find a folder named Calibration Client.
- Copy the Calibration Client folder to the workstation PC that is connected to the Eizo.
- Open Lightspace.
- In Lightspace, open the Lightspace Network Manager and click the green Enable button.
- Get the IP address of the notebook (where Lightspace is installed) by running the ipconfig command in a Command Prompt.
- On the workstation (that is connected to the Eizo), go inside the Calibration Client folder.
- Double click the CalibrationClient.jar file to start the Calibration Client.
- In the Calibration Client we go to Calibration > Connect.
- We enter the IP address of our notebook. This will establish a network connection between the Calibration Client and Lightspace.
- To ensure that Lightspace is connected to the Calibration Client go back to the Lightspace Network Manager and check that the workstation's IP address is listed in the white text area (see image below).
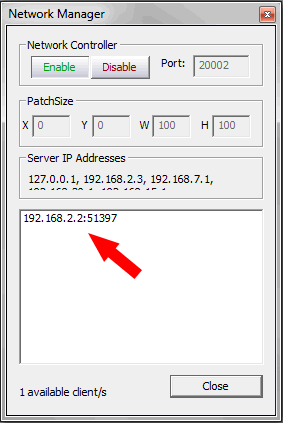
Another way to verify that Lightspace controls the Calibration Client on the remote workstation is to open the Calibration Interface in Lightspace and then change the currently displayed patch. You will see that the patch changes in the Calibration Client.
Now we run the display profile using our custom profiling patch set in the Display Characterization section.
LUT Creation & LUT Upload
Once the profiling is done, we create a Rec 709 Gamma 2.2 LUT from the display profile in the Convert Color Space section in Lightspace. With the LUT open in Lightspace, we now upload it directly to the internal memory of the Eizo via Lightspace using the File > Upload > Eizo menu.
Gamma Validation
Before we run the full 1087 point validation, we first check on Gamma performance of the LUT as Lightspace provides features to improve Gamma which is very easy to do using the Lightspace Custom Color Space Creator.
In order to check the Gamma performance of the LUT, we run a 101 point Greyscale only patch set, which you can easily create in the Custom Color Patch Sequence Generator | Custom Patch Set section. The reason we run a 101 point Greyscale profile is because not only is this a sufficient amount of data but this is also the maximum amount of Gamma adjustment points that Lightspace allows and we want to make as many adjustments as we can.
Here's the gamma graph of the Rec 709 Gamma 2.2 LUT from the original display profile evaluated with a 101 point Greyscale in the Lightspace Profile Reporter:
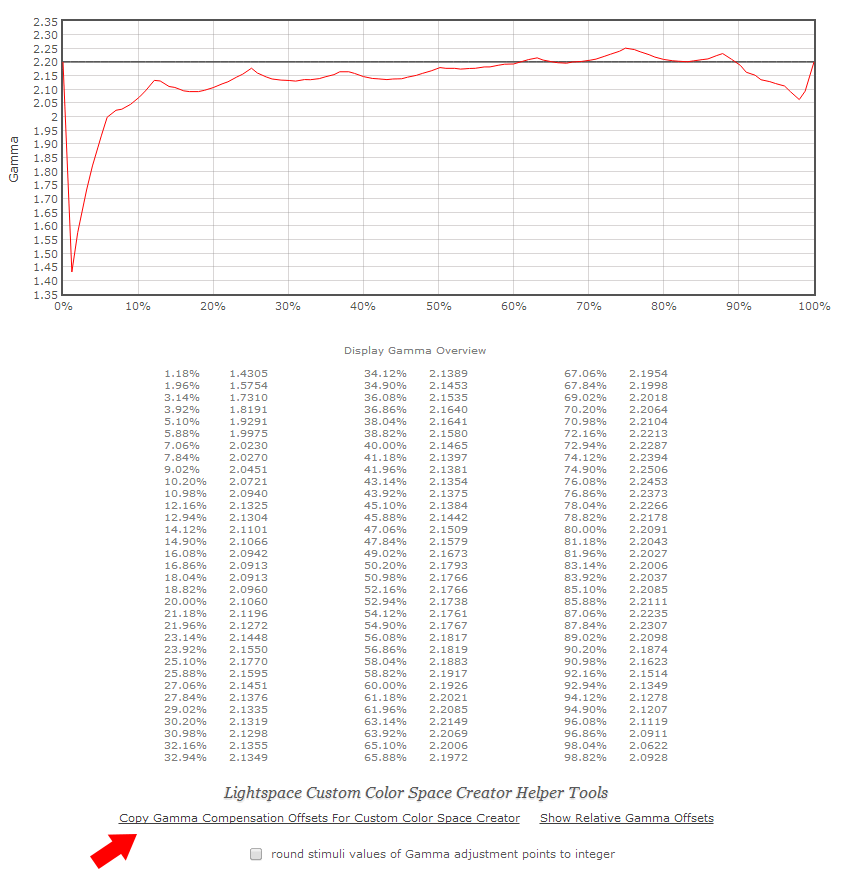
Stats:
- Average Gamma: 2.14
- Greyscale Average dE 2000: 1.2668
- Greyscale Max dE 2000: 2.3246
The gamma of the CG275W is not great and it takes a bit more steps than with other screens to get the gamma in a better shape, so we will go into detail below how to improve the gamma of the Eizo CG275W.
Note: Although the gamma spikes at 0%-5% stimuli and 95%-100% stimuli are larger deviations from the gamma target, the actual luminance output at these points compared to the target luminance output is minimal (not as drastic as it appears on the graph). The way gamma is calculated at stimuli points at the beginning and at the end of the stimuli range make gamma deviations look more drastic on this particular graph type, that is why the Lightspace Profile Reporter always displays 2 different gamma graphs. In our gamma adjustments, we will not worry too much about these stimuli ranges.
Gamma Improvement
In order to improve the Gamma of the LUT we will use the Lightspace Custom Color Space Creator to create a custom color space with Rec 709 gamut coordinates and specific Gamma adjustment points and then use that custom color space in Lightspace to create a new LUT from it.
To do this you could now go to the Lightspace Custom Color Space Creator and start manually creating gamma adjustment points by looking at the gamma values below the gamma graph and then calculate offsets, but Display Calibration Tools has a few helpers that pretty much automate the process. In the Lightspace Profile Reporter, simply click the "Copy Gamma Compensation Offsets For Custom Color Space Creator" link marked with a red arrow in the above screenshot (wait until the message "Done !" appears) which creates 99 gamma adjustment points and sends them to the Lightspace Custom Color Space Creator.
The maximum number of gamma adjustment points that Lightspace allows in a custom color space is 101 and without black (0% stimuli) and white (100% stimuli) that do not have gamma, we are left with 99 gamma adjustment points. Again, this is the reason we ran a 101 point Greyscale so we can create and use the maximum number of gamma adjustment points - the more adjustment points, the better.
We now go to the Lightspace Custom Color Space Creator tool and create a new custom color space.
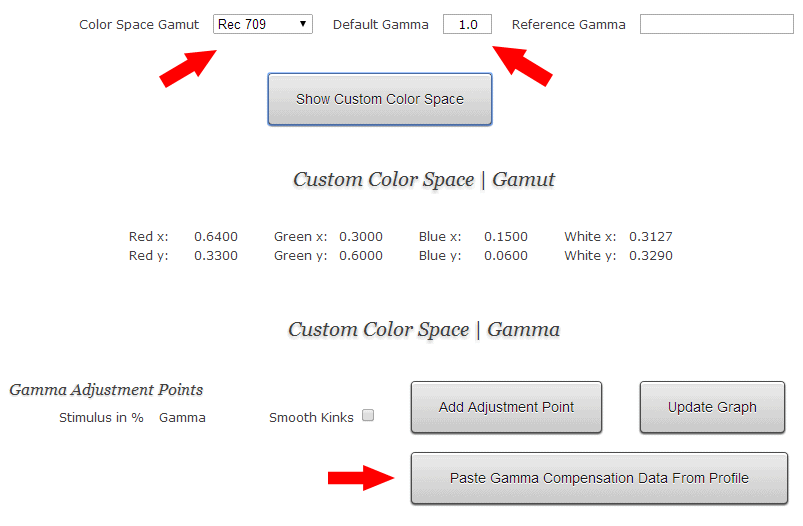
As you can see we have created a new custom color space with Rec 709 gamut (simply select Rec 709 from the preset menu) with a default gamma of 1.0, not 2.2.
Now this can be confusing, but the reason we use 1.0 is that if one uses a lot of adjustment points (and we will be using the maximum of 99) it is better to state a default gamma of 1.0 which allows us to freely shape the gamma response of the custom color space to our liking, and most importantly this results in more accurate adjustments. If you only a have a few gamma adjustment points, then it is better to state a default gamma of 2.2 (if you are targeting a 2.2 gamma) - but again, the more adjustments points you create, the better.
The "Paste Gamma Compensation Data From Profile" button pictured above only appeared because you created gamma adjustment points in the Lightspace Profile Reporter. We click the button and 99 gamma adjustment points are created for us - here's a partial screenshot of the 99 adjustment points:
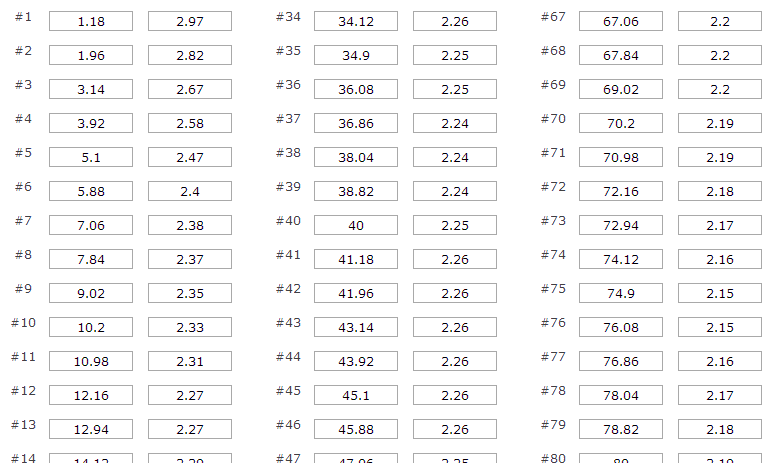
Save the custom color space, e.g. Eizo_CG275W_ccs_1 - we will be doing multiple custom color spaces so name accordingly.
Do not close this window, leave the Custom Color Space Creator section open and leave all adjustment points exactly as they are. These points will be used as a base if we want to further revise the gamma response.
In Lightspace in the Convert Color Space interface, we now create a new LUT from this custom color space.
In the SOURCE Color Space select menu choose the custom color space that you have created. If it is not in the list, then you can make your custom color space available by using the Manage option at the bottom and then choose Import. Once done, you can see that it shows you 101 parametric points which are our 99 adjustment points plus black (0%) & white (100%).
In the DESTINATION color space select menu, choose your original display profile, in our case our profile with 10,142 points.
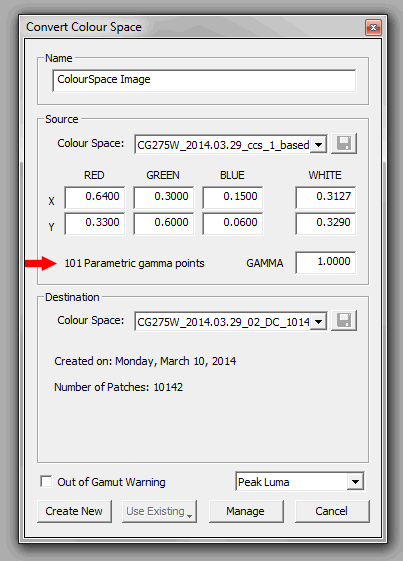
Once the LUT is created, reset the internal memory bank of the Eizo by uploading a null cube via the File > Upload > Eizo interface and check the NULL CUBE checkbox to ensure the CAL mode is reset to default. Now same as before, upload the new LUT to the Eizo via the File > Upload > Eizo interface (un-check the NULL CUBE checkbox).
Custom Color Space Gamma Validation & Further Adjustments
The process that starts now can be repeated as many times as you like until you are happy with the gamma, it is usually not necessary to do it more than once or twice as usually the gamma response does not improve further after that.
We run another 101 point Greyscale only profile on the Eizo that now uses the LUT that was created from the first custom color space and validate the profile with the Lightspace Profile Reporter. The Gamma now looks like this:
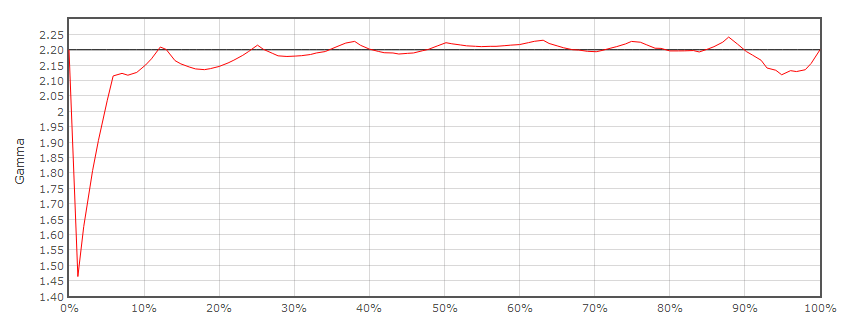
Stats:
- Average Gamma: 2.17
- Greyscale Average dE 2000: 1.0546
- Greyscale Max dE 2000: 1.7140
As you can see, the gamma is not only closer to the target line of 2.2 but also all delta E numbers have improved.
We want to further improve the gamma, although you can already see that the Eizo has a very specific gamma response: note the curves / waves that are still in the gamma response, although we did make gamma adjustments you can see that the Eizo does not (fully) react to adjustments at these points.
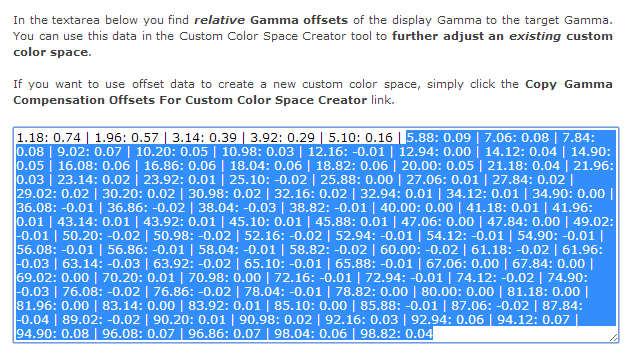
The process to further adjust an existing custom color space is similar to what we've done so far, with a small difference: In the Lightspace Profile Reporter, below the gamma graphs and the gamma overview, now click the link "Show Relative Gamma Offsets".

This will show a textarea that contains relative gamma offsets for each of the stimuli points. We will use the gamma offset data and apply it to our existing custom color space which has the original gamma adjustments. 2 very important things about this process:
(a) It is important to understand that all further gamma revisions / gamma adjustments must be made to the gamma adjustment points of the last custom color space, that is why we said above to not close the custom color space section and to leave all original adjustment points intact.
(b) The stimuli points of the relative gamma offset points must match the stimuli points of the last custom color space in order to apply the new offsets. Since we created the first custom color space from a 101 point Greyscale only profile (with 99 adjustment points) and we now ran another 101 point Greyscale only profile (giving us 99 adjustment points), the stimuli points naturally match.
Now we copy the data in the textarea.
As you can see in the screenshot below, we only copy here the data for stimuli points 5.88% and higher. The reason being that the large gamma spike from 0% - 5.88% (that you can see on any gamma graph of the CG275W) cannot be adjusted on this screen and it does not make sense to keep increasing the gamma at these stimuli points - not only will it not help but it could (after a few adjustments) negatively affect the rest of the custom color space.
As stated earlier, if you see larger gamma spikes (on any screen) within 0%-5% and 95%-100%, these spikes can usually not be fully fixed but most importantly although they look drastic the actual luminance difference is minimal at these points, so don't worry too much about these points.
We switch back to the Lightspace Custom Color Space Creator window with our last 99 adjustment points, and below the adjustment points on the right side we click the "Show Advanced Options" link. In the now visible textarea, we paste the relative gamma offset data that we copied from the Lightspace Profile Reporter. Here's a screenshot:
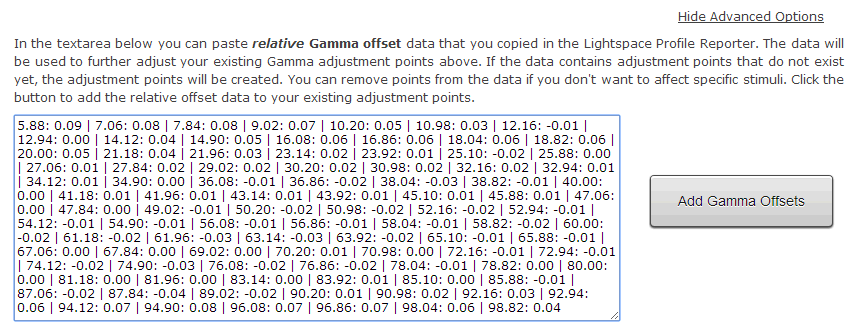
Now we click the Add Gamma Offsets button to add these new offsets to our existing adjustment points.
The following steps are the same as before:
- we save this new custom color space (e.g. Eizo_CG275W_ccs_2)
- we import the custom color space into Lightspace, so we can select it in the Convert Color Space select menu
- we create a new LUT from our Eizo_CG275W_ccs_2 custom color space and our original 10,142 point display profile
- we reset the internal memory bank of the Eizo with a NULL CUBE
- we upload the new LUT to the internal memory bank of the Eizo
- we run another 101 point Greyscale only profile
- we then validate the Gamma performance via the Lightspace Profile Reporter
- we could optionally use the relative gamma offsets again to further adjust the existing custom color space and repeat this process
On this Eizo CG275W we did this a total of 3 times - it took altogether 15 minutes - and 3 custom color spaces is usually the maximum we would do for any screen, but as stated before the Eizo has a very specific gamma response that needs some extra tweaks. Here's how the gamma looked on our third custom color space:
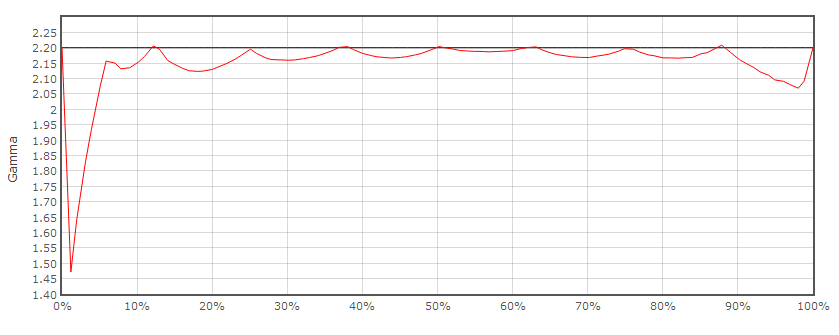
You can see that some points are perfectly on the 2.2 target line (let's call them "anchor points") while other points in-between lie on a curve and seem to be not (fully) affected by our gamma adjustments but rather by the gamma at these "anchor points" that pull/push the in-between points up/down (depending on adjustment of the anchor points).
We will do one final gamma adjustment: we will add again relative gamma offsets to all stimuli points between 5.88% and 94.90% (we ignore the last spike from 95%-100%) and manually add an additional gamma of 0.03 to these "anchor points" which are at 5.88%, 12.16%, 25.10%, 38.04%, 50.20%, 63.14%, 76.08% and 87.84%.
This will push the "anchor points" above the target line but hopefully pull the curves (which are the majority of the points) onto the target 2.2 line. Here are the gamma response and stats from our final custom color space:
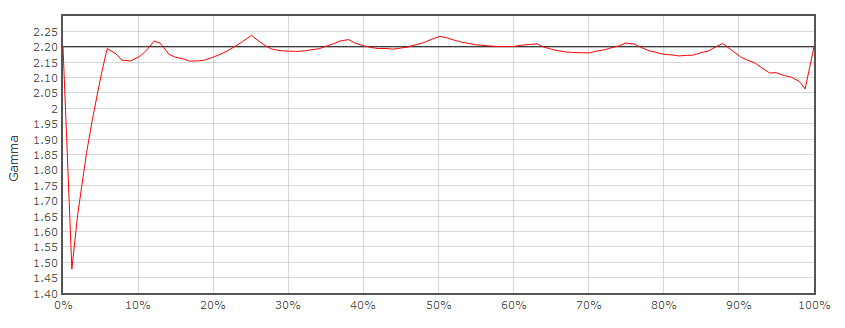
Stats:
- Average Gamma: 2.18
- Greyscale Average dE 2000: 1.0046
- Greyscale Max dE 2000: 1.6493
As you can see all stats improved and the gamma response between 6% - 90% is consistently close to the target of 2.2. And now that we know the "anchor points" all gamma adjustments in future calibrations will be easier.
Eizo Active LUT Distortion
The multiple 101 point Greyscale validation profiles that we ran were all done with the LUT active in the Eizo. This is the best way to validate the performance of a LUT as the LUT holder (in this case the Eizo internal memory) can introduce distortion when it is processing the LUT to adjust the signal, and these validation profiles (with the LUT active in the Eizo) will report that.
An usually recommended workflow is to have the LUT active in Lightspace (instead of the LUT holder) to avoid time consuming LUT upload times. Fortunately, the direct LUT upload to the Eizo is very fast, so having the LUT active in the Eizo is the very best validation method.
An advantage of running profiles with the LUT active in Lightspace is that you can see how accurate the adjustments actually are that the Lightspace color engine calculates. If the validation on the LUT uploaded to the Eizo then reports other data, then this might be a sign of distortion the Eizo introduces when processing the LUT.
Here's the gamma graph of our second custom color space with the LUT active in Lightspace validated in the Lightspace Profile Reporter using a 101 point Greyscale only profile:
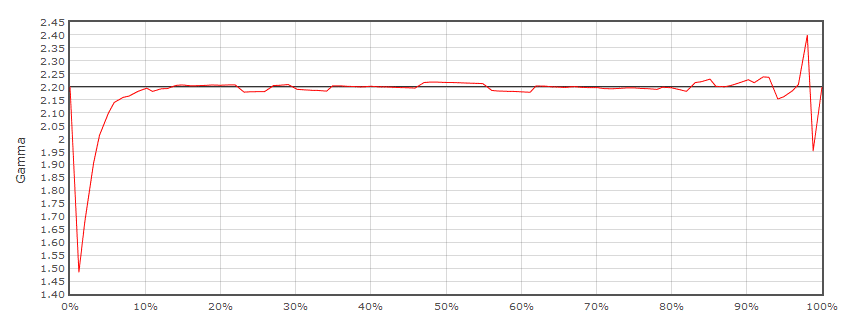
As you can see the gamma response (between 5%-95%) is almost perfect.
Here's the same LUT active in the Eizo:
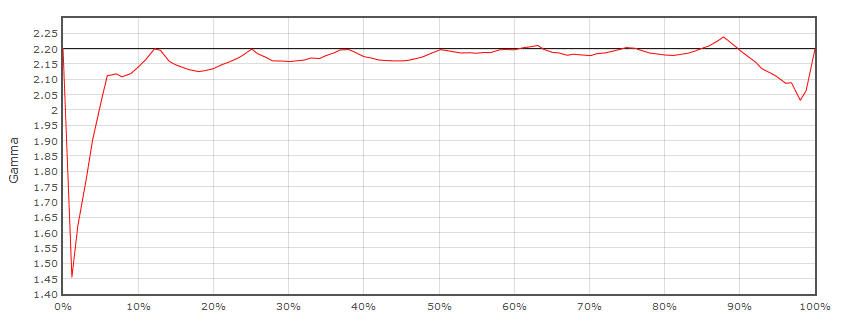
The gamma response is different and unfortunately not as good, which indicates the distortion the Eizo adds when processing a LUT from it's internal memory.
We therefore strongly recommend in all Eizo calibrations to always run validation profiles with the LUT active in the Eizo internal memory, same as we did here in this calibration guide
This ensure that we always see the true state of the calibration and we can make appropriate adjustments.
Color Validation - 1087 Point Patch Set
We now run a full validation profile using Lightspace, our custom 1087 point patch set and the K10-A with spectro offset. Here are the main sections (except Gamma, which we have validated already) from the report of the Lightspace Profile Reporter tool:
To learn more about how custom patch sets can improve your calibration please read the Advantage Of Custom Color Patch Sets In Display Calibration guide.
CIE xy chart - the trails again indicate low saturated colors in the shadows (typical for LCD displays) and we can see the blue/cyan LCD backlight contamination, although less problematic here than in the ColorNavigation calibration:
RGB Separation:
Delta E Distribution:
Greyscale & RGB Balance:
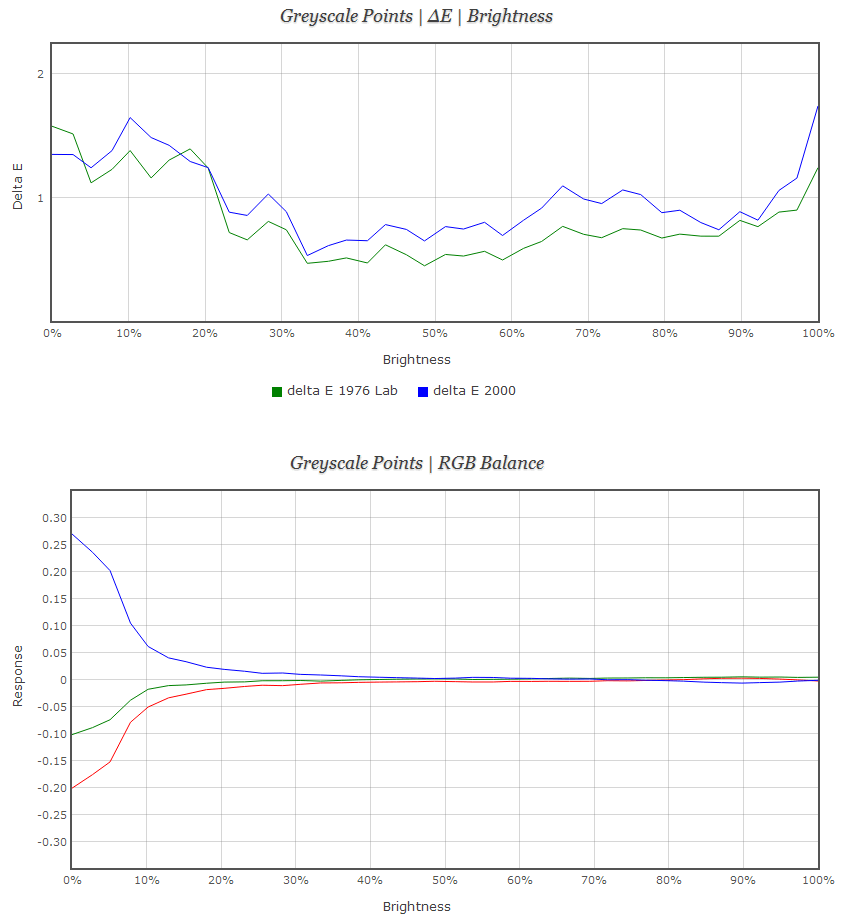
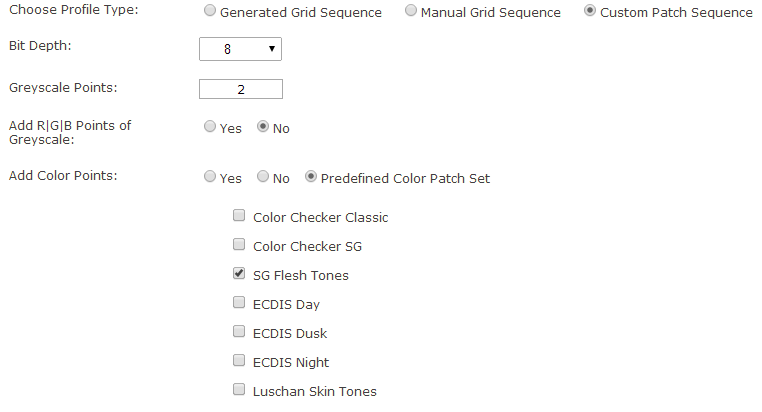
Color Validation - SG Flesh Tones
SG Flesh Tones patch set created via Custom Color Patch Sequence Generator:
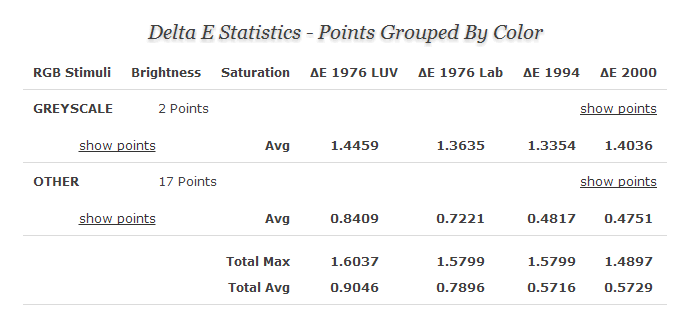
Delta E performance (19 points - 17 points without Greyscale points) validated in the Lightspace Profile Reporter:
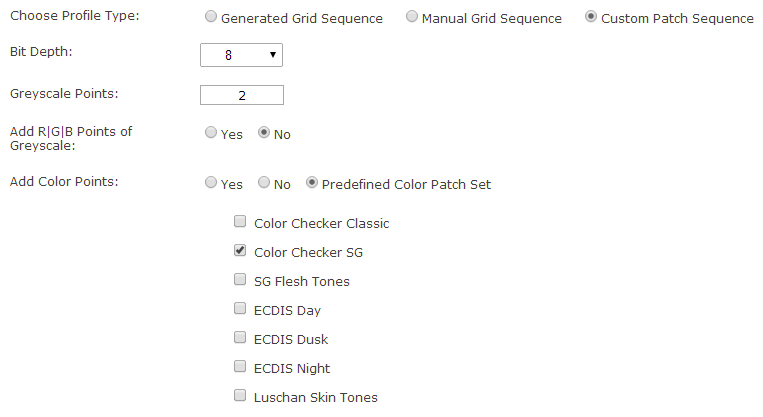
Color Validation - Color Checker SG
Color Checker SG patch set created via Custom Color Patch Sequence Generator:
Delta E performance (96 points - 81 points without Greyscale points) validated in the Lightspace Profile Reporter:
Color Validation - Delta E 2000 Filter 2.3
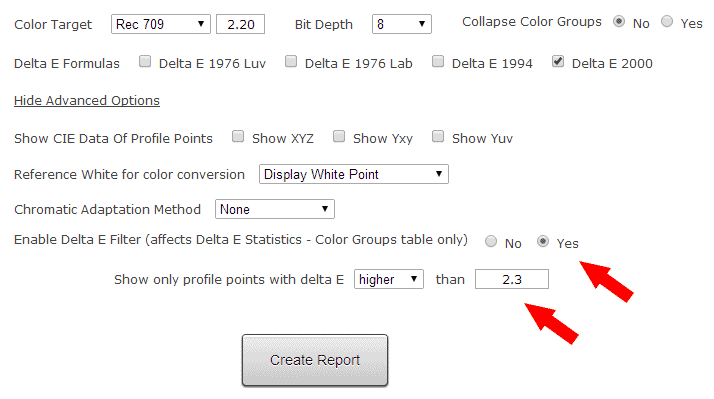
Our final check is to use a delta E 2000 threshold of 2.3 and see how many points are above that.
Here's the Lightspace Profile Reporter setup for our 1087 point validation profile:
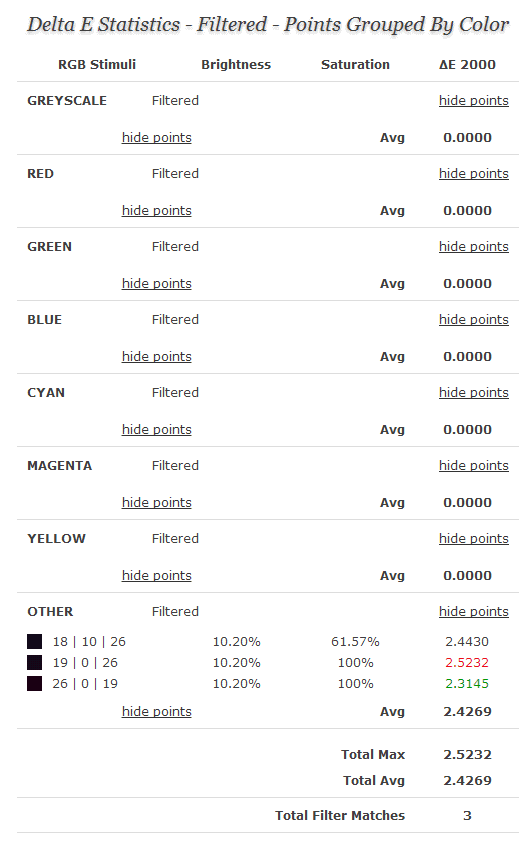
The report only shows 3 points (from our 1087 point custom validation patch set) that have a delta E 2000 of higher than 2.3 and those 3 points are most likely victims of the LCD backlight contamination that only affects darker colors:
The performance of the Lightspace LUT (created from our custom color space) is clearly superior to the ColorNavigation LUT.
This is the best calibration you can achieve on the Eizo CG275W.
Eizo Calibration Via ColorNavigator & Lightspace
This calibration approach sounds like the best of both worlds, here's the process:
- Setup the Eizo via ColorNavigator before profiling and dial in the settings we want: brightness, max luminance, color space.
- Run a display profile via Lightspace.
- Create a LUT from the display profile and export the LUT from Lightspace - the only supported LUT formats are Autodesk Flame / Lustre or Truelight. Truelight has a 64^3 3D LUT, so that is the preferred version.
- Now merge the Lightspace LUT with the ColorNavigator setup data (that is already stored in the internal memory bank) via an option in the ColorNavigator software.
Since the CG275W only has one internal memory bank for each CAL mode, it is necessary to merge both data sets and unfortunately this process distorts the accuracy of the final results.
Here's a CIE chart of the calibration LUT being active in Lightspace (not in the Eizo) - this shows the theoretical result of this approach:
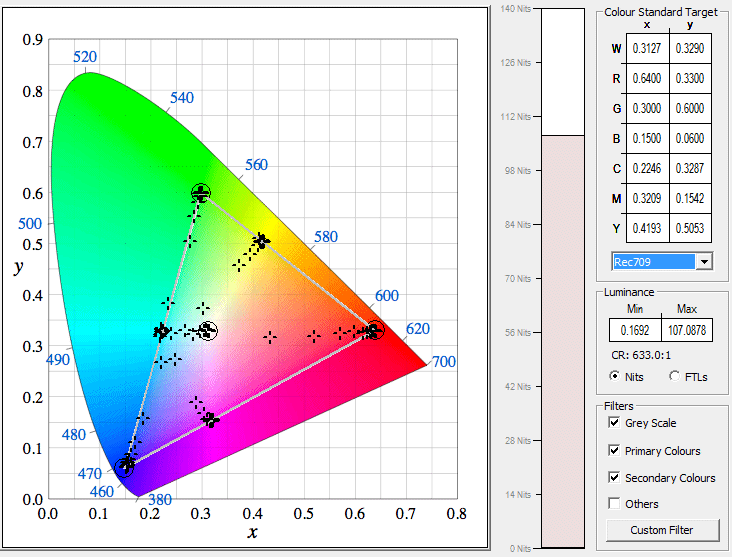
And here is the result once we merged the Lightspace LUT with the ColorNavigator data inside the memory bank of the Eizo CAL mode:
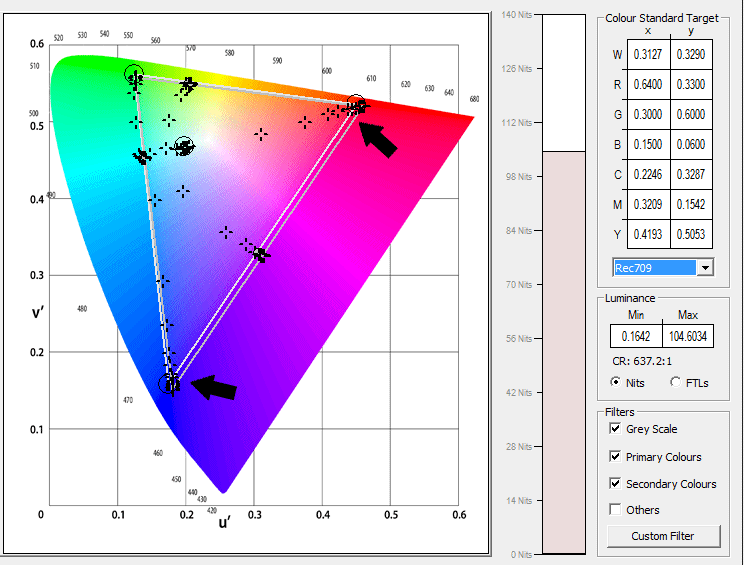
There is no need to further validate this calibration, because as we can see on the CIE chart above the results of this approach are not suitable for color critical application.
Stay informed about our professional calibration solutions, new display calibration guides and workflows, and exclusive promotional offers - register here for free.
For other Display Calibration Guides & Workflows, please click here.